Photo by Hardleers
How to: Road to fast and stable test suite
It’s an extension for my presentation from Ruby User Group Berlin meetup in September, 2018, You can find slides here.
A beginning of the story on how we speed up test suite in one of the projects at Akelius from one hour to less than 10 minutes.
TL;DR: Divide and Conquer
- start with making tests run in parallel in the easiest possible manner
- start tracking tests that fail in each of the subsets of tests
- reproduce and fix issues locally
Why?
I don’t think it needs to be said out loud but here it goes - slow and flaky test suites are bad for you! If Your suite runs for over 10 minutes you are hurting yourself and your team. But let us start from the beginning. When I started in Akelius, application test suite was running for an hour. Yes, you read it correctly - an HOUR. It also had order dependant test failures, so 1 in 4 builds could randomly fail.

By using Github checks, that CI needs to pass in order to merge a Pull Request, this would basically block the deployment to next stages. Due to a random failure, the build would be usually restarted in order to move forward - which doesn’t mean it would be green on the next run.

This resulted in:
- very long feedback loops
- lots of distractions due to context switching
- frustration
- and a useless test suite, which was more of a drag than a help
- cost us lots of time
So how did we handle this? We had to speed it up first, in order to easier track down random test failures. How to do it with least effort in the ruby world?
Enter: knapsack gem

Knapsack doesn’t require any extra setup for additional services you are using, like database or chrome. Instead, it relies completely on the isolation provided by CI nodes. The only logic involved is how to evenly divide test files across nodes, so nodes run time is balanced, i.e. all nodes finish in ~5 minutes, instead of one finishes in 2 minutes and another one in 8.
Installation is quite easy and documentation covers a variety of ruby test runners.
Parallelize tests with the knapsack
Add gem in Gemfile.
group :test, :development do
  gem "knapsack"
end
Add tasks in Rakefile.
Knapsack.load_tasks if defined?(Knapsack)
Bind knapsack in top of spec helper file.
require "knapsack"
Knapsack::Adapters::RSpecAdapter.bind
Generate report, so knapsack will know runtime of the specific test files and will be able to evenly split them across nodes. It’s best to run it on actual CI node, so results will be closest to real ones.
# locally
$> KNAPSACK_GENERATE_REPORT=true bundle exec rspec spec
# or on CI, i.e. edit .travis.yml file
script:
  - "KNAPSACK_GENERATE_REPORT=true bundle exec rspec spec"
When the build completes, it will print out the new JSON report which will look something like:
{
  "spec/models/supply_spec.rb": 0.7876174449920654,
  "spec/models/tax_spec.rb": 0.22003436088562012,
  "spec/models/text_document_spec.rb": 3.3623762130737305,
  "spec/models/user_spec.rb": 318.7685122489929,
  ...
}
Commit report to the repository in knapsack_rspec_report.json file.
The last step is to actually configure CI setup. In our case it was TravisCI, but you can find docs for CircleCI and others as well, on knapsack documentation page. Here we say that we run our tests across 8 workers.
env:
  global:
    - RAILS_ENV=test
    - CI_NODE_TOTAL=8 # total number of workers

  matrix:
    - CI_NODE_INDEX=0
    - CI_NODE_INDEX=1
    # ... 5 more vars
    - CI_NODE_INDEX=7

script:
  - "bundle exec rake knapsack:rspec"
Now lets watch them fly! 🚀

Bonus #1: Outsource linters
In our case we were using linters during CI run. By moving to CodeClimate, we shaved another ~30 seconds per build.
Afterwards we could let go 4 gems from Gemfile, which reduced total number of dependencies by 11.
Bonus #2: Use headless chrome and cache dependencies
Always try to prefer dependencies, that come preloaded on CI machines and make use of them. This will usually result in extra bonus seconds, that can be spent running suite, instead of installing dependencies by hand.
One of such dependencies is chrome, which we use for acceptance tests.
# .travis.yml
# remove
before_install:
  - sudo apt-get install chromium-browser

# add
addons:
  chrome: stable
And if you are using headless chrome, instead of xvfb, you need to download the chromedriver for it to work. We make use of builtin caching mechanism, to download it, only if it’s missing in the cached directory. With this we saved extra ~20s per build. And we can easily install newer version if needed.
# .travis.yml
cache:
  bundler: true
  directories:
    - ~/bin

before_install:
  - ./bin/ci_install_chromedriver
In bin/ci_install_chromedriver we specify the script for checking and installing chromedriver. We test against specific version, which will help invalidate the cache when we update. You can use something simillar for other dependencies as well.
#!/bin/bash
set -Eeuo pipefail

VERSION="2.41"
NAME="chromedriver_${VERSION}"
STORAGE=https://chromedriver.storage.googleapis.com

install_chromedriver() {
  rm -f ~/bin/chromedriver*

  wget ${STORAGE}/${VERSION}/chromedriver_linux64.zip

  unzip chromedriver_linux64.zip
  rm chromedriver_linux64.zip
  mv -f chromedriver ~/bin/${NAME}
  chmod +x ~/bin/${NAME}

  ln -s ~/bin/${NAME} ~/bin/chromedriver
}

[ -e ~/bin/${NAME} ] || install_chromedriver
Track and fix random failures
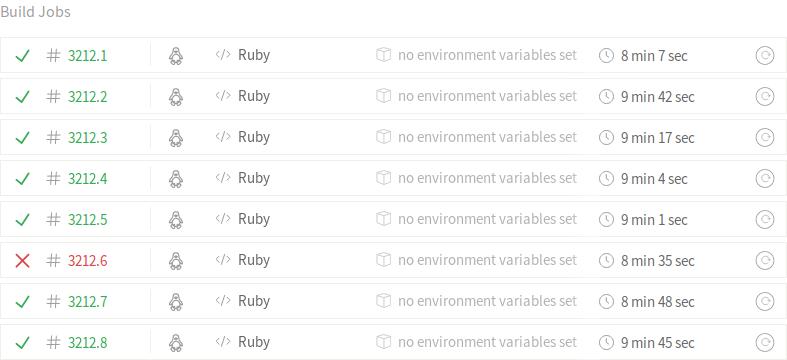
Since we now have fast running test suite, we don’t only fail fast, we also reproduce the problem fast as well - as we now know the subset of tests that’s causing the failure. In order to reproduce those locally, we first need to find the job that failed, its CI_NODE_INDEX, and rspec order seed. First one decides which files to run, second dictates in which order those are run.

After finding the job, you should be able to locate the seed, at the bottom of the failed test output.

Now, we can easily reproduce it locally, by running following command.
$> CI_NODE_TOTAL=8 \
   CI_NODE_INDEX=5 \
   bundle exec rake "knapsack:rspec[--seed 4049]"
You can also try using RSpec --bisect flag, to create a minimal repro case for the ordering dependency. It will usually also find other issues on the way and take some time depending on the test suite. Usually it’s worth the wait, and if it’s taking too long, you can always get results so far by hitting CTRL+C.
$> CI_NODE_TOTAL=8 \
   CI_NODE_INDEX=5 \
   bundle exec rake "knapsack:rspec[--seed 4049 --bisect]"

# =>

Report specs:
spec/models/user_spec.rb
# and a load of other tests scoped by knapsack

Leftover specs:

Running via Spring preloader in process 17947
Bisect started using options: "--seed 4049 --default-path spec -- spec/models/user_spec.rb and a load of other tests scoped by knapsack"
Running suite to find failures... (4 minutes 23.9 seconds)
Starting bisect with 6 failing examples and 921 non-failing examples.
Checking that failure(s) are order-dependent... failure(s) do not require any non-failures to run first

Bisect complete! Reduced necessary non-failing examples from 921 to 0 in 12.51 seconds.

The minimal reproduction command is:
  rspec ./spec/features/attachment_spec.rb[1:1:1,1:2,1:3] ./spec/features/project_spec.rb[1:1] ... --seed 4049 --default-path spec --
We had one example failing in the job, and we have found 6 in total by running it with --bisect flag.
Fix the issue and repeat
This is subject for whole new post, or most probably, even a book. It will mostly depend on the test suite, but in general look out for:
- if using Rails, autoloading issues, especially when you have deeply nested structures like ActiveRecord models and Single Table Inheritance
- using sleep statements, commonly found in acceptance tests
- database pollution, i.e. some deeply nested
before :allblocks, which run once for the whole file and not in the scope of nested describe/context blocks - make sure that the order of the elements doesn’t play a role in tests that don’t demand it, i.e. results in arrays
If You can’t fix them, as they happen, don’t blindly restart the build. Instead note down the CI_NODE_INDEX and seed. You can use some simple TODO list, but from my experience it’s better to plan it properly. For example, create maintenance ticket in JIRA (or in project management tool you are using), keep track of it, write down other failed examples. So when the time comes, You can fix them in one go or assign as subtasks within the team.
Profit & Sanity
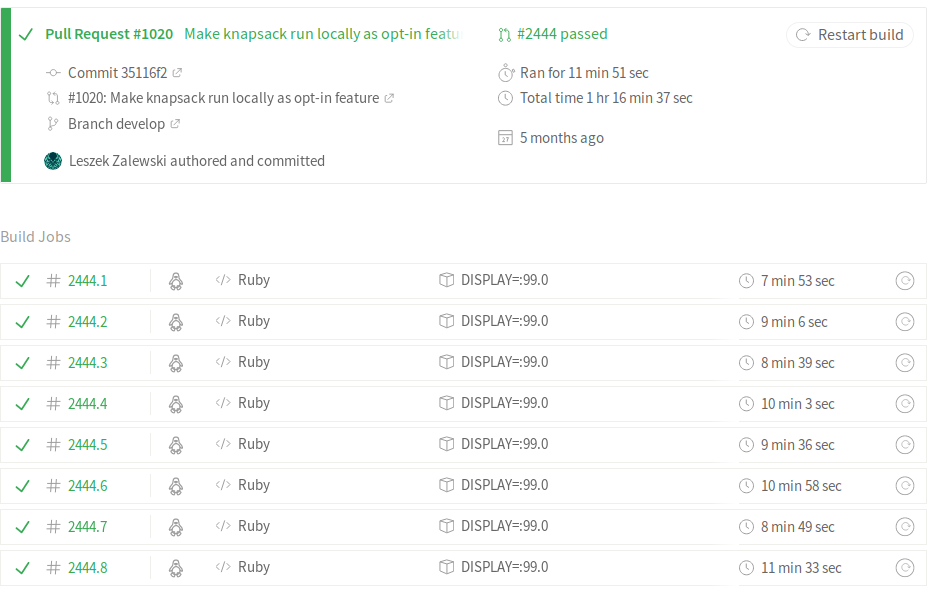
After the first improvements, tests were running around 49 minutes faster per build, which resulted in:
- faster iterations on the tasks at hand
- running the whole suite more often without the fear of failure
- fewer distractions and context switching due to waiting for the results
- team happiness and time to delivery :)
There was one small drawback though - by using 8 workers, we block most of our available CI capacity. You can probably already imagine, pushing one commit after another and blocking CI for everyone. This is something to look out for, also maybe there are ways to cancel previous builds on the same branch. We will investigate it in future when it becomes a bottleneck.
Next steps
First improvements resulted in a build time of around 11 minutes, in next article we will go over how we shaved another 2 minutes, by using a mix of different strategies for cleaning up a database. We will also explore Jenkins, as a CI setup with kubernetes support and using docker images for build environments.
Stay tuned and happy hacking!
